Volgers

zaterdag 30 juli 2016

Happy Wedding!

Hi everyone!

There's a new challenge at Copic Marker Europe: Fantasy!

We have a few friends who are getting married this year and I wanted to create something different for a wedding card than usual. So I decided to make a card with the "Magical Friends" stamp set by The Greeting Farm. I think these ponies are so adorable!


I sponged the background with distress ink and heat embossed the hearts. I used my Wink Of Stella silver glitter brush to colour in the 2 hearts.

Here are the Copic colours I've used:
yellow: Y17, 15, 11, 00, V22
orange/pink hair: YR07, 04, 02, RV17, 55, 52
green: BG49, 34, G00
blue: B37, 34, 32


Deborah

woensdag 27 juli 2016

Wonderful Wednesday: Have a Purr-fect Day

Hi everyone!

It's a Wonderful Wednesday at Kraftin' Kimmie Stamps and you know what that means, it's challenge time! As always it's anything goes.

And for today I made a card with one of my favourite clear stamps set "A Purr-fect Day". I simply adore this cute cats!  I sponged my background with some yellow and green Distress Ink.
Then I heat embossed the fishes with some silver embossing powder and stamped the sentiment with some blue ink.


The papers and dots are by Doodlebug "Kitten Smitten", a perfect addition for the stampset.
The cat is coloured with Copic markers, here are the colours:
grey: C5, C3, C1 (few layers)
pink: R20, RV000
blue: B05, B02, B00, B000

Happy Kraftin! 

zaterdag 23 juli 2016

Summer Challenge!!!

Hi everyone!

Are you ready for another challenge at Kraftin' Kimmie Stamps?
This time I'm the hostess and I choosed to have a summer challenge.
The summer is my favourite time of the year.
And this year I want to enjoy it a lot! 

I made this card with one of my favourite stampset of this year: "Ocean of love"


I coloured this little cuties with my Copic markers.
Here are the colours that I've used:
pink: RV69, RV17, RV55, RV52
V09, V06, V04
blue: B99, B97, B95, B93, B91
BG18, BG13,BG11

 I made a shakercard with, the sequins are by Neat & Tangled and they are called "Pink Lemonade sequin mix". I love the colours!
The papers I've used are by Echo Park "Let's Be Mermaids".

Can't wait to see all your summer creations!!!
Be sure to join the challenge!

I want to enter some other challenges too:

woensdag 20 juli 2016

Een huis gekocht!

Hallo allemaal!

Mijn broer had samen met zijn vriendin al sinds januari het compromis getekend om hun huisje te kunnen kopen. Door speciale omstandigheden van de verkoper kon de akte pas in juli plaatsvinden. 
Dus na heel lang verlangen en dromen konden ze zich vorige week eindelijk de eigenaar van het huis noemen. Nu kunnen de verbouwingen van hun nieuwe stulpje beginnen!


Voor hen wou ik natuurlijk nog een leuke kaart maken om ze te feliciteren met hun aankoop. Ik heb het internet een beetje afgezocht achter een leuke stempel met een huis en ik ben dan uiteindelijk voor deze gevallen "Castle Hideaway" van Make It Crafty. Het is dan wel niet een kasteel dat ze gekocht hebben maar het is hun eigen paleis.

Toen ik de digitale stempel afgeprint had, zag ik even door de bomen het bos niet meer. Overal lijntjes en ik had precies geen moed meer om te beginnen kleuren. Ik heb dan eerst mijn B000 marker genomen en overal een aanzet gegeven waar de lucht moest komen. Daarna heb ik met mijn YG11 hetzelfde gedaan met het gras en de kruinen van de bomen en zo zag ik al heel wat beter waar ik kon beginnen met kleuren.


Hier zijn alle Copic Marker kleurnummers die ik gebruikt heb:
lucht: B02, B00, B000
kasteel: BV29, BV25, V25, V22, V20
gouden accenten van kasteel: E37, E35, YR23, Y21
boomstammen: E59, E37, E35, E31
boomkruin groot: G28, G16, G14, G12
boomkruin klein + struik: G28, YG17, YG13, YG11
stenen: C7, C5, C3, C1
gras: G28, YG09, YG06, YG03, YG11
riviertje: B99, B26, B24, B21
bloemen: Y15, YR04


Op het einde heb ik nog een vleugje Wink Of Stella gebruikt om de gouden dingen te accentueren en om het riviertje een schittering te geven. Met de witte Molotow marker heb ik tenslotte nog wat witte accentjes aan het riviertje gegeven.

Fijne dag verder!
 Groetjes,


zondag 10 juli 2016

Hop day: Unicorns and rainbows!


Hi everyone!

It's finally here!!! 
The RELEASE of our JULY 2016 clear stamp sets!!!


We've released ALL FOUR of the MAGICAL new clear stamp sets that we've been previewing all week and we're celebrating with a super fun krafty HOP! So grab a nice hot beverage and put your feet up because you will need a few relaxing minutes to enjoy all the magical creations by our design team and guest!!


I made a card with the new Unicorns and Rainbows stampset by Becky Pearce.
I think they might be my favourite of this release, they are super cute and so many possibility's to colour and make a card. They remind me on My Little Pony, I loved playing with them when I was a kid.
cloud die: Lawn Fawn "Puffy Cloud Borders"
rainbow die: My Favorite tings: Stitched Rainbow


You will get to see ALL of the new sets in action as you sit back and enjoy the hop! Then head on over to the Krafty Shop because ALL of the new stamp sets are NOW AVAILABLE!

And if you HAVE to have it ALL, we also have our July Gimme Kimmies Kit which includes all FOUR of the new sets together and at a discount! But only for a limited time and while supplies last!

Now let's celebrate with our NEW release and get
hoppin' and shoppin'!!


zaterdag 9 juli 2016

Kraftin' Kimmie Peeks day 4: Unicorns & Rainbows

Hi everyone!

Welcome back for our final day of July krafty peeks! And not only do we have a fabulous new set of stamps to share with you....it's challenge day too wich is anything goes!


Today we are previewing a super magical new set of images and sentiments by artist, Becky Pearce! Who doesn't love these fairytale creatures??!! 
This new set is called 

UNICORNS & RAINBOWS!!!


First I watercoloured a background with Caran d'ache Neocolor 2 on a piece of watercolouring paper and depped a little colour off with a tissuepaper.
While it was drying I coloured the clouds + rainbow and the unicorn. I used some designpaper by Doodlebug "Under The Sea" because it has the rainbowcolours in it. I added some sequins in normal and heart shape and the card is finished.


Here are the Copic colours I've used:
clouds: C5, C3,  C1
red: R59, R46, R24
yellow: Y18, Y15, Y11
green: YG09,  YG06, YG03
blue: B05, B02, B00
purple: V09, V17, V15,V12
aqua: BG18, BG13, BG11, BG10


You'll be able to check out lots of inspiration using the new set from our amazing Krafty Girl Design Team! Below you'll find links to all the gorgeous creations and while you're visiting the blogs, be sure to comment and leave some love for our designers because one lucky krafty person is going to WIN a gift card to the shop!


All of our new July clear stamp sets will be released TONIGHT! Be sure to join us at the 
LIVE Online Release Party beginning at 6pm EST! 
Come join us to help celebrate the new release, check out lots of krafty kreations, have a chance to win some prizes and just have fun! Hope to see you there!

Happy hoppin'!


donderdag 7 juli 2016

Krafty peeks day 2: Book Dragon!

Hi everyone!

Woohoo! It's day 2 of our Krafty peeks, are you ready???

How many of you are readers??? How many people you know are book nerds?? Well we've got a fabulous new stamp set for you in today's preview! We're so excited to share the new set by artist Emilie Goulet called BOOK DRAGON!!! 
 Think of all the opportunities for texture colouring on this fabby guy! I love him so much!!


This time I've used my brand new paperpad by Simple Stories "Sunshine & Happiness". I just love the colours in this pad and I used the matching Copic colours to colour my dragon. 
I used the dotting techinique on him and added white dots on the orange part of him.
The oval die is by My Favourite Things: Scalloped oval


Here are all the colours I've used:
pink: RV19, RV17, RV55, RV52
orange: E08, YR07, YR04, YR02, YR00
turqoise: BG18, BG13, BG11, BG10
shadow: W3, W1


You'll be able to check out lots of inspiration using the new set from our amazing Krafty Girl Design Team in today's blog hop! Below you'll find links to all the gorgeous creations and while you're visiting the blogs, be sure to comment and leave some love for our designers because one lucky krafty person is going to WIN a gift card to the shop!


All of our new July clear stamp sets will be released on Saturday night! Be sure to join us at the 
LIVE Online Release Party beginning at 6pm EST! 
Come join us to help celebrate the new release, check out lots of krafty kreations, have a chance to win some prizes and just have fun with the Krafty Girls and me! Hope to see you there!

Happy hoppin'!


woensdag 6 juli 2016

Kraftin' Kimmie Peeks day 1: Witch Wanda!


Hi everyone!

It's day 1 of our July Krafty peeks!! Yaaaay! I hope you are just so excited like I am, you will love the new stamps!!!
The theme is totally MAGICAL!


Today we are sharing TWO wicked new stamp sets by artist Annie Rodrigue!! The first is a hauntingly cute witch called WITCH WANDA! 


When I started colouring on my witch I decided to not use the typical halloween colours. I wanted to create a non halloween card with non halloween colours. I failed... haha!!!  But I'm happpy with the result ;-)


I wanted to use pink for her bow and her jacket but it turned out more purple than pink, and I wanted to created a background full of stars. I tried it with dark blue and black first, but the images didn't pop enough. So I tried to sponge a red, orange and yellow background and that was much better. I sprankled some water over it and depped it off with a tissue and added some white acryl dots and depped them off too. I added some starsequins on the background for some magical effect. I worked 5 hours on this card and it's CAS.... 


I coloured this gorgeous with my Copic markers using the no lines technique. I stamped with the Memento inkpad Desert Sand.  Here are the colours that I've used:
skin: E13, E11, E00, E000, R20
hair: E59, E09, YR07, YR04
black: 100, BV29, BV25, BV23
purple: BV29, RV69, RV66, RV63
turqoise: BG18, BG13, BG11, BG10
eyes: G46, G43, G40
yellow: Y17, Y15, Y11


The second set features another silly little witch called
WITCH WILLA! 


You'll see both of these fun stamp sets featured by our amazing Krafty Girl Design Team and Guest in today's blog hop! Below you'll find links to all the gorgeous creations and while you're visiting the blogs, be sure to comment and leave some love for our designers because one lucky krafty person is going to WIN a gift card to the shop!


All of our new July clear stamp sets will be released on Saturday night! Be sure to join us at the 
LIVE Online Release Party beginning at 6pm EST! 
Come join us to help celebrate the new release, check out lots of krafty kreations, have a chance to win some prizes and just have fun with the Krafty Girls and me! Hope to see you there!


Happy hoppin'!


dinsdag 5 juli 2016

Geisha and Cherry Blossom

Hallo allemaal!

Laatst kwam ik deze digitale stempel "Geisha and Cherry Blossom" van Julia Spiri toevallig tegen en ik heb deze dan ook meteen aangeschaft.
Ik ben namelijk helemaal verzot op geisha's. Enkele zomers geleden had ik tijdens mijn vakantie het boek "Dagboek van een geisha" gelezen en dat heeft me echt geraakt.
Altijd jammer als zo'n topboek uitgelezen is.


Het gezicht heb ik zo licht mogelijk proberen te houden en daardoor zit er minder diepte in dan normaal in mijn kleurwerk. Ik hou echt niet van hele witte gezichten, die doen me op Ć©Ć©n of andere manier denken aan een spook, haha. Haar ogen heb ik roze oogschaduw gegeven, wat ook veel gebruikt wordt bij hen en natuurlijk mochten de knalrode lippen niet ontbreken.


Het zwarte haar wou ik iets anders inkleuren dan ik normaal deed. Meestal hou ik het bij de grijze tinten maar deze keer heb ik er een vleugje blauw in verwerkt. Het zorgt er ook voor dat de geisha niet te Ć©Ć©ntonig of grijs wordt. Als afwerking heb ik hier en daar in een hoekje een schaduw aangebracht met grijs. Zo springt de afbeelding er toch een beetje uit.


Dit zijn de Copic Marker kleuren die ik voor deze afbeelding gebruikt heb:
gezicht: E13, E11, E00, E000, E0000/R20
haar: 100, C9, C7, B24, C1
oogschaduw: RV34, RV32
roze: RV69, RV09, RV55, RV52
blauw: B26, B05, B02, B00
rode lippen: R59, R35
schaduwrand: C5, C3, C1

Dank je wel voor het bezoekje en het achterlaten van een reactie, altijd fijn om te lezen!

Groetjes,


maandag 4 juli 2016

Bottom of the sea background tutorial

Hi everyone!

Are you ready for another Krafty Tip and Tuts? 
Great! I made an other under water tutorial, but this time I focus on the bottom of the sea.
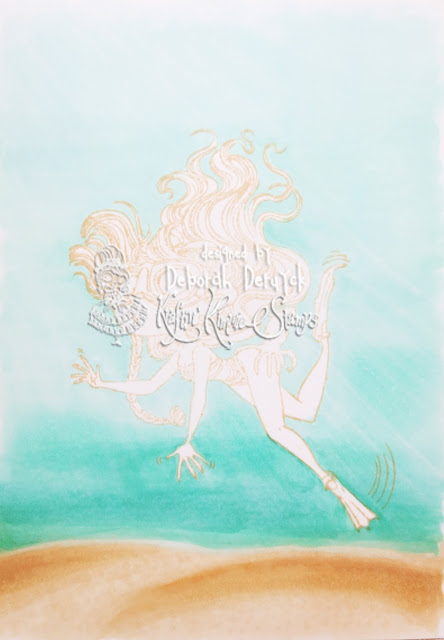
Perfect for all your mermaid or other underwater stamps, on this card I've used the gorgeous Dolly Diver.

Warning: there are tons of images!


First I stamped Dolly Diver with Memento Desert Sand on Neenah cardstock by Crafter's Companion. You can do this on any paper you use for colouring with alcohol markers.
I coloured a border with E41 for the bottom of the sea. It doesn't have to be flawless.

After that I came in with E31 to add some depth on the bottom and blended it out with 41.

Then I coloured the water with a layer of BG000. I doesn't have to be a perfect colouring, it's only a base.

Right above the bottom of the sea I've added a splash of BG34 and BG23.

I blended those colours together with my BG11.

I blended the colours out with BG10 towards the top. The background base is ready now.

Now I had to add a light source. the sunshine comes in from the upper left corner. I've marked with my blender the lightsourse in the colourwork. You'll notice the lighter lines in the water now.

 After we created the lighter parts, it's time to create some darker lines to. I did that with BG34.

Blend the lines out with BG11. Do you see what is happening?

After we did the lower part, it's time to do the upper part. I choose to use some blue colours for this one: B32 and B91 and blended it out with BG000.

 I repeated the last steps to have more contrast.

 After that it's time to draw some plants with YG06.

Create some depth with YG09 and finish with G28.

 Create some texture on the sand by adding dots at the darkest places with E33.

 Add some E31 dots around the previous ones to blend them out and add some new dots.

As final step you can blend the latest dots out with E41 and add some texture again by putting dots on the whole bottom part. And it's finished!!! 

Here's the card I made with Dolly Diver and this background.

I hope you will give this background a try!


I just want to enter some challenges with this card:

Thanks for reading and commenting, I really appreciate it!!!

DeborahS